


在此输入您的增值税号,然后单击验证:
您的详细信息已经过验证。增值税号注册至:
,
。
现在,您的订单的增值税税率为零。我们保留在您提出订单请求后验证这些详细信息的权利,并在需要时恢复增值税。
您的增值税详细信息无法识别或无效。您的增值税号必须与上面指定的帐单国家/地区相匹配。当前指定为 。您无需输入增值税号的国家/地区代码部分,因为已在上面的帐单地址详细信息中选择了该部分。
增值税号查询服务目前已离线。请在下面的评论或特殊说明字段中提供您的增值税详细信息,我们将在您提出订单请求后应用增值税折扣。
按车型类型筛选
按品牌过滤

0PB105249/2
Product Information

Fits
Boxster/Cayman 1997-2008
Porsche 911 Carrera 1999-2008 (Excludes Turbo, GT3 and GT2 models)
Description of Tool
This is a 3D Printed tool for installing the Rear Main Seal on Porsche M96/M97 engines to the correct depth without damage to the seal. The tool is 3D printed from hard, black plastic and is very solid and durable. It is aimed at DIYers and hobbyists due to its low cost in comparison to the official Porsche tool, but would be well suited to small independent garages as the tool can be reused many times without damage.
How to use
Care must be taken when using this tool as although it is designed to make the installation of the seal as easy as possible, it is still possible to damage or incorrectly install the seal if care is not taken to install the seal properly. We accept no responsibility for incorrect usage of the tool and possible damage to the seal or engine of the vehicle. We advise you to always confirm with a digital calipers or other measuring device to make sure the seal is installed at the correct depth.
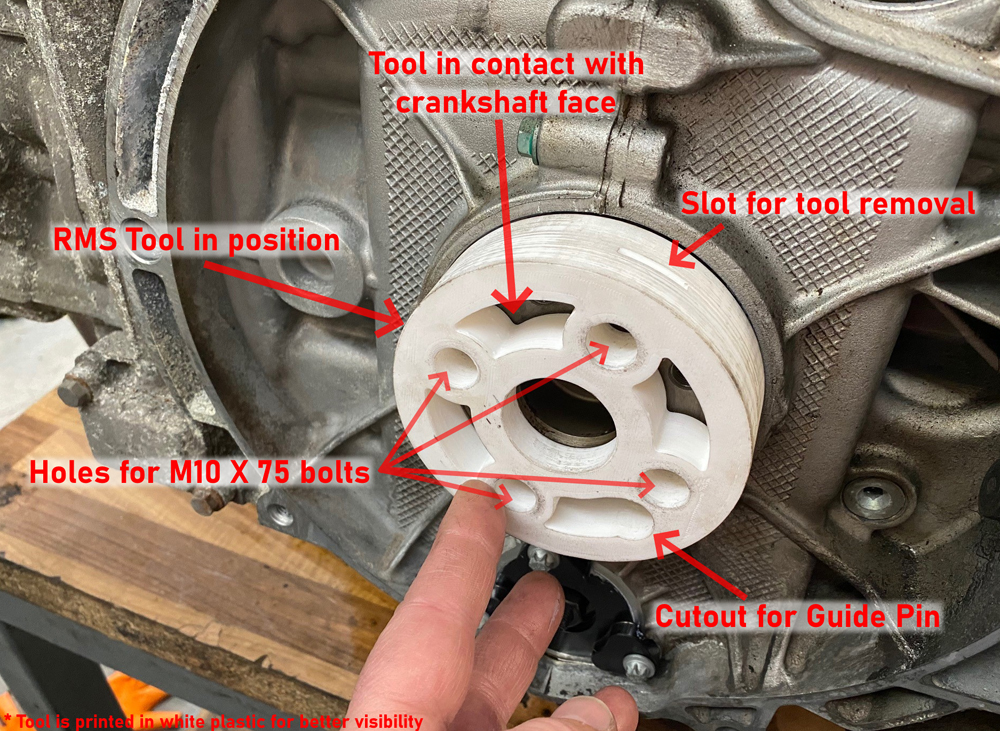
To use this tool you will also need 4 M10 X 75mm bolts and 4 washers. This is to allow for the extra thickness of the tool, and to spread the force from the bolts across the surface of the tool.
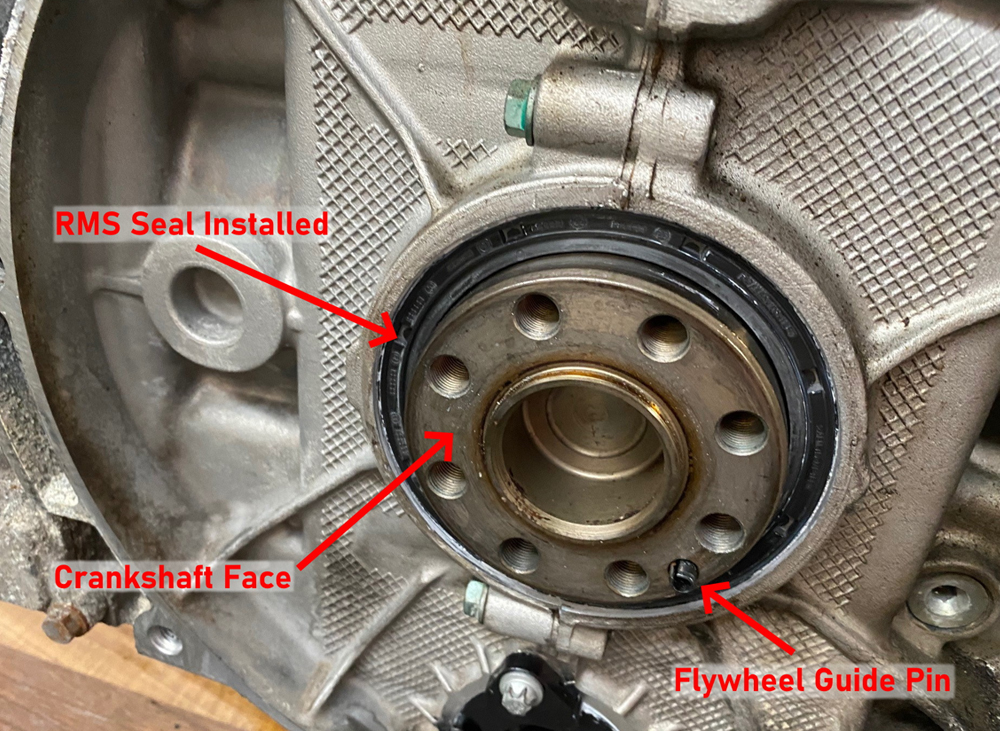
The seal must first be correctly orientated and then gently located into the opening around the crankshaft. To do this, leave the blue plastic ring in place and place the seal over the end of the crankshaft. Then push the seal on gently so that the end of the crankshaft pushes the blue ring out of the seal and the seal gets pushed onto the outside of the crankshaft.
Next place the RMS fitting tool over the seal and thread each of the 4 bolts into the crankshaft, through the holes in the tool. Make sure to orientate the tool so that the cut-out for the flywheel guide pin in the crankshaft lines up with the pin. Screw each bolt in slowly until they just about make contact with the face of the tool. From this point on the seal will start to be inserted into the engine.
Turn each bolt a quarter turn at a time, turning all 4 a quarter turn before tightening the first one again, and continuing the cycle. It is very important that the bolts are tightened small amounts, one at a time to make sure that the seal is inserted straight and not at an angle which will damage the seal.
Repeat this until the face of the crankshaft comes into contact with the inner face of the tool and it will not push the seal in any further. Remember that the tool is plastic so excessive force at the point will possibly damage the tool and push the seal in too far.
The 4 bolts can now be unscrewed and fully removed from the crankshaft. The tool can then be removed. It may be a slightly tight fit, and if it is difficult to remove by hand then there are slots in the sides of the tool to allow a screwdriver or prying tool to grip the tool and remove it. If using the slots, be careful to apply even force to both sides to ensure that the tool does not come out at an angle and get stuck or potentially move the seal.
Once the tool and bolts are removed, visually inspect the seal to make sure there is no damage. Then, use a ruler, digital callipers or depth gauge, check the depth of the seal. It should measure 13mm, from the face of the crankshaft to the face of the seal. As long as the tool was used correctly and is suitable for your engine, the seal will be installed at the right depth.
These instructions are only intended as a rough guide, you should always check a workshop manual or research online to ensure the part is being installed correctly. Using this tool requires some practical knowledge so if you are not confident in your abilities please do not attempt to install the seal yourself.
相关参考编号
相关编号、被取代编号、交叉引用编号或替代编号,供比较之用。
0PB105249
您正在查看的产品与这些编号存在交叉引用关系
Product Information
Rear main oil seal fitting tool Porsche Boxster and 911 M96/M97Fits
Boxster/Cayman 1997-2008
Porsche 911 Carrera 1999-2008 (Excludes Turbo, GT3 and GT2 models)
Description of Tool
This is a 3D Printed tool for installing the Rear Main Seal on Porsche M96/M97 engines to the correct depth without damage to the seal. The tool is 3D printed from hard, black plastic and is very solid and durable. It is aimed at DIYers and hobbyists due to its low cost in comparison to the official Porsche tool, but would be well suited to small independent garages as the tool can be reused many times without damage.
How to use
Care must be taken when using this tool as although it is designed to make the installation of the seal as easy as possible, it is still possible to damage or incorrectly install the seal if care is not taken to install the seal properly. We accept no responsibility for incorrect usage of the tool and possible damage to the seal or engine of the vehicle. We advise you to always confirm with a digital calipers or other measuring device to make sure the seal is installed at the correct depth.
To use this tool you will also need 4 M10 X 75mm bolts and 4 washers. This is to allow for the extra thickness of the tool, and to spread the force from the bolts across the surface of the tool.
The seal must first be correctly orientated and then gently located into the opening around the crankshaft. To do this, leave the blue plastic ring in place and place the seal over the end of the crankshaft. Then push the seal on gently so that the end of the crankshaft pushes the blue ring out of the seal and the seal gets pushed onto the outside of the crankshaft.
Next place the RMS fitting tool over the seal and thread each of the 4 bolts into the crankshaft, through the holes in the tool. Make sure to orientate the tool so that the cut-out for the flywheel guide pin in the crankshaft lines up with the pin. Screw each bolt in slowly until they just about make contact with the face of the tool. From this point on the seal will start to be inserted into the engine.
Turn each bolt a quarter turn at a time, turning all 4 a quarter turn before tightening the first one again, and continuing the cycle. It is very important that the bolts are tightened small amounts, one at a time to make sure that the seal is inserted straight and not at an angle which will damage the seal.
Repeat this until the face of the crankshaft comes into contact with the inner face of the tool and it will not push the seal in any further. Remember that the tool is plastic so excessive force at the point will possibly damage the tool and push the seal in too far.
The 4 bolts can now be unscrewed and fully removed from the crankshaft. The tool can then be removed. It may be a slightly tight fit, and if it is difficult to remove by hand then there are slots in the sides of the tool to allow a screwdriver or prying tool to grip the tool and remove it. If using the slots, be careful to apply even force to both sides to ensure that the tool does not come out at an angle and get stuck or potentially move the seal.
Once the tool and bolts are removed, visually inspect the seal to make sure there is no damage. Then, use a ruler, digital callipers or depth gauge, check the depth of the seal. It should measure 13mm, from the face of the crankshaft to the face of the seal. As long as the tool was used correctly and is suitable for your engine, the seal will be installed at the right depth.
These instructions are only intended as a rough guide, you should always check a workshop manual or research online to ensure the part is being installed correctly. Using this tool requires some practical knowledge so if you are not confident in your abilities please do not attempt to install the seal yourself.
相关参考编号
相关编号、被取代编号、交叉引用编号或替代编号,供比较之用。
0PB105249
0PB105249
99911349040
99710121201
0PB105249
0PB105249
您正在查看的产品与这些编号存在交叉引用关系
产品车辆组
产品车辆组
- Porsche Boxster 986 2.5L 1997-99
- Porsche Boxster 986 2.7L 1999-02
- Porsche Boxster S 986 3.2L 1999-02
- Porsche Boxster 986 2.7L 2003-04
- Porsche Boxster S 986 3.2L 2003-04
- Porsche Boxster 987 2.7L 2005 -08/08
- Porsche Boxster 987 S 3.2/3.4L 2005-08/08
- Porsche 996 C2 3.4L 1997-08/01
- Porsche 996 C4 3.4L 1997-08/01
- Porsche 996 C2 3.6L 09/01-2005
- Porsche 996 C4 3.6L 09/01-2005
- Porsche 996 C4S 3.6L 09/01-2005
- Porsche 997 MK1 Carrera 2 3.6L 2005-08
- Porsche 997 MK1 Carrera 2S 3.8L 2005-08
- Porsche 997 MK1 Carrera 4 3.6L 2005-08
- Porsche 997 MK1 Carrera 4S 3.8L 2005-08
- Porsche Cayman 2.7L 987C 2006-08
- Porsche Cayman S 3.4L 987C 2005-08
价格: €111.15 含 VAT
有现货 - 24 小时发货
 安全购物
安全购物
 12 个月保修
 全球交付
全球交付
也可在这些页面找到

 987C.2 Cayman 2.9L / 3.4L 2009-12")


关于专业工具
用于精准、高效、高质量保时捷发动机重建的专业工具
发动机大修需要精确的测量、正确的装配流程和合适的设备,以确保每个部件都能完美契合并按预期运行。由于保时捷发动机独特的工程设计、严格的公差要求以及针对特定车型的维修流程,专用工具在维修过程中至关重要。这些工具能够帮助技术人员和爱好者以专业的精度拆卸、检查、重建和校准发动机,从而降低损坏、错位或安装错误的风险。
无论是进行发动机全面修复、进行正时调整、检查内部组件还是安装性能部件,使用正确的专业工具都能保证可靠、持久和高质量的重建。
专业发动机大修工具的作用
高质量的专业工具可确保整个重建过程的精准性和安全性。它们的设计目的在于:
- 精确测量关键公差,包括缸径、缸体高度、活塞环间隙和气门间隙。
- 正确安装和拆卸曲轴、活塞、缸套和轴承等部件
- 支持正时程序,包括凸轮轴对准和中间轴设置
- 拆卸和组装过程中防止损坏精密部件
- 利用专用夹具和固定工具提高重建效率
- 确保均匀施加扭矩,从而促进良好密封并延长部件寿命。
- 协助进行诊断任务,例如泄漏测试或压缩验证
专业工具对于打造专业级发动机、获得可靠且可重复的结果至关重要。
为什么车间工具会磨损或失效
即使是设计精良的工具,也会因频繁使用、操作不当或暴露于恶劣环境而随着时间的推移而老化。常见的故障原因包括:
- 反复载荷引起的金属疲劳
- 拉拔器、压机或扭矩工具上的螺纹磨损或滑丝
- 潮湿或化学物质引起的腐蚀
- 在排气管或气缸盖附近作业造成的过热损伤
- 校准失效,尤其是在测量或扭矩敏感工具方面。
- 因误用或用力过猛导致接触点损坏
- 碎屑或车间污垢造成的污染
工具故障会导致测量不准确、工作环境不安全,甚至造成代价高昂的发动机损坏。
为什么专业工具需要更换或升级
更换磨损的工具或升级到精密设计的替代品能带来明显的益处:
- 提高了关键发动机尺寸的测量精度
- 更可靠的组件安装,降低错位风险
- 更安全的车间操作规范,防止人员受伤或发动机损坏
- 稳定的扭矩和校准对于密封和轴承负载至关重要。
- 提高效率,节省复杂重建过程中的时间
- 与现代发动机和性能升级具有更好的兼容性
- 更高质量的重建结果,提高发动机可靠性和使用寿命
使用合适的工具是对发动机翻新质量和发动机健康的投资。
您可能也喜欢
流行车型